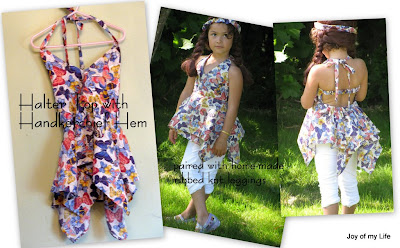
Sewing: Halter Top with Handkerchief Hem

I've always loved the asymmetrical handkerchief hem in flowing long belly-dancing skirts. It takes a lot of fabric to get it full and round. I've made a couple of asymmetrical hem skirts for Ana, but, when I decided to make a halter top this time, rather than the usual A-line, I wanted to add an extra dimension with the handkerchief hem.
Halter tops are terribly cute on little girls, and the simplest A-line cut is quite darling, no frills, no fancy, yet adorable. And this butterfly print fabric Ana picked out was quite special that I didn't want to sew something ordinary again. My mind was set on halter top or halter dress and since I didn't have enough for a halter dress, halter top it had to be.
There are a number of websites offering ideas and tutorials for the handkerchief hem:
- fold the required* fabric in half and half again to form a smallish square that has 4 layers due to the folds [* I had a yard of 45"-wide fabric, so, I cut a 36"x36" square piece of this fabric to fold in half to form an 18"x36" rectangle, then fold again to form a 18"x18" square]
- using a piece of string tied to a sewing chalk or pen, draw a small arc with center at the folded corner point; the radius of this arc is important as this part will form the circular waist opening when we unfold the fabric; make it small, we can always make it bigger; we can invoke the waist-circumference = 2Πr equation to find the radius r for this arc; but, even then, I was conservative and made the r smaller than the result of the calculation above for the first cut
- ideally, for a skirt, at this point, we'd do the elastic casing, thread the elastic and be done; or, I'd make a fitting large waistband that forms a yoke and attach the asymmetrical skirt part
But, for this halter top, I cut out the top yoke front with a V-neck - two pieces sewn right sides together to form a lining, but no interfacing as I didn't want it too stiff; then, attached this to the handkerchief hem skirt part; added elastic to the rest of the handkerchief hem skirt part that forms the back so it fits around the body well rather than hang loose.
For the halter top part, rather than the traditional bare back with tie at the nape, I added a 1-inch wide strip of fabric casing with elastic which helps with the fit around the body, and helps her feel not so... bare :)
The leggings were made with white ribbed knit fabric - simple cut, much like pants, except fitted to the legs and waist. As ribbed knit is a bit stretchy anyway, it works out well.
This was a great learning experience for me. Not having learnt any formal sewing, and getting just a few tips and tricks from my mom who taught herself sewing as well, I tend to work on projects that challenge me a bit and take me from my current level to the next.
I am not good at pattern drafting yet and many of the simple easel paper cutouts I have made for the kids' measurements would be laughed at and dismissed by experienced seamstresses... but, I do this for fun.
Being on a budget, I tend to get the fabric remnants and other promotional fabrics (read: On Sale) that are not much more than 2$/yard. This limits my choice... there are such gorgeous designer textiles that I'd love to have, but, that's just a dream for now. And, the threads have gotten expensive as well, so I rarely match the thread with the fabric colors - black and white serve me fine, easier to have matching bobbin threaded and ready.
 Of course, there was just enough fabric left over to make one for Enid as well! But, she didn't get the fancy handkerchief hem, just a round skirt part for the halter top. And her knickers seem so darn adorable with this new halter top.
The nice part was that, the circular piece cut out from Ana's was perfect to form the circle-skirt part of this halter top/dress for Enid. All that was left was to add the yoke/bodice/tie.
The halter top for Ana, and the matching little one for Enid used just about one whole yard of fabric, which is all I had, with just enough to spare for the little headband that is in the picture.
Anyway, the satisfaction of having made a lovely outfit and seeing it worn with pride and joy by the kids makes it worthwhile for now.
Labels: ribbed knit, sewing, summer clothes


3 Comments:
Oh, wow! Sheela, She's a fairy in that top!!!
Wow. She really does look very cute! Phew. You leave me gasping with the awesomeness of your cute cretaions every time.
Thanks, Kay & Chox!
Each project is a learning experience for me, so, it's nice to read your kind words :)
Post a Comment
<< Home