Related Posts Widget for Blogs by LinkWithin


Rarely There

A collection of discourses - myriad, profound, uplifting...
Bah! Who am I kidding?!
It is just a blog.

Sunday, April 1, 2012

Crafts: Needle Felted Blue Bird and Wet Felted Basket


I had just a small bit of lovely blue and orange merrino wool roving that my mum-in-law had bought for me a couple of  years ago and decided to make something small and cute with them.


The blue bird is needle-felted (much like the fairy dolls) - uses very little wool, some repetitive Zen-like needle-poking (protect those fingers, ouch!). The quarter is for perspective - it is quite a tiny bird, just the right size for pencil topper or mobile.


For the wet felted basket, I used a small bowl I had for the mold: place the bowl upside down, add criss-crossing layers of wool roving all around, get some dish soap in hand, pour hot water and work it in to wet felt, much like the wet-felted purse.

Labels: ,


Monday, January 2, 2012

Crafts: Paste Batik Cushion Covers


Much like the last couple of cushion covers, these use paste batik technique (as in the Letters Flag project) just as a mask to preserve the white of the muslin on the outlines.

One of my favorite subjects for art work is fish. I like the variety of colors and even variation in the general shape that makes it fluid and gorgeous. The fish and the turtle called to me, just insinuated themselves in my head and refused to be overlooked.

I had a whole series of fish paste batiks planned in early autumn, but, with all the other things I *have* to do, this seemed like a luxury and so was put in the back burner, as with many other projects teeming in my head.


Over Winter break, I got to finish these two at least, and sew them into standard 18x18 inch cushion covers. These are very simple shapes and colors, nothing intricate. Simplicity is the key.

White muslin, some flour and water, fabric paints. Plus a quarter yard of gorgeous professional batik fabric for the back of the cushion cover.

Other than waiting - for the paste to dry, then the paint to dry, then washing the fabric and allowing it to dry again after heat-setting - this project was a breeze. A very relaxing one. Easy to finish as the actual work is very little.

Koi. Angelfish. Clown fish. Needle fish. Gold fish. Fan-tailed guppy. Even cat fish perhaps? So many fish are swimming in my head waiting to be paste-batiked. Hope I get to them in 2012.


Labels: , ,


Thursday, April 21, 2011

Crafts: Wool Roving Waldorf-style Fairy Dolls

Needle and Wet Felted Fairy dolls (Waldorf-style)

Last year, Nana initiated us into felting. I've made a few felted items on and off for hobby since then. Wet Felting as well as Needle Felting.

With a limited budget to splurge on crafts/arts supplies, it seems a bit out of my range to buy good quality wool for my felting projects. Thanks to Nana, I had a stash of beautiful soft merino wool roving in wonderful colors to start with. And, since Fabric Depot has sale on and off, I manage to find enough to fit my frugal allowance and my urge to create hand-made things for family and friends.

Anyway, Nana gave Ana a Waldorf-style wool doll she bought from her friend to aid in a fund-raising drive to save Amur Leopards. Ana liked it so much that we decided to make some for ourselves, hoping that if we got good enough at it, we would try to have our own fund-raising drive for causes dear to our hearts... but, that is a long dream. For now.

I made a few and let Ana watch. Then, when she felt ready, I let her help me make a couple. We've given away a few to Ana's friends. I still supervise Ana closely for needle-felting. The rest of the doll is simply wrapping up wool roving and tying with wisps of wool or thread or ribbons.

wool roving felted fairy doll waldorf style

In Waldorf-style, we left the facial features out. It might feel a bit disconcerting for some, but, kids seem to accept it and appreciate it more easily, in general. I did add in the features for some later on to see if we liked it better.


If a few of the fairies look jaundiced, it's because the nearest color I had to flesh tone (dark or light) was this mild yellow wool roving. I didn't have undyed merino enough to custom dye it myself. After all, fairies (and people) come in all colors, so I wasn't too concerned.

The best part for Ana was of course the hair. It had to be long. Really long. And have some hair accessories.

waldorf doll fairy felted hand-made

We named each of the fairies. This is Gwanwyn, the Springtime fairy. She makes sure blossoms bloom in spring time. She loves to visit the gardens everywhere. You might find her in yours if you time it just right!

Kids Crafts: Felted Fairy Dolls (Waldorf-style)

Here is Gwanwyn with bright eyes and a wide smile.

Needle and Wet Felted Fairies (Waldorf-style)

Here's Grisial, the Crystal Fairy (blue). She makes sure rocks have sparkling quartz and chalcedony inside, making the geodes special for anyone who finds them. And, Berl, the Gemstone Fairy (orange). She watches over minerals and other rocks that humans like to make into jewelry.

wool roving needle felted Fairy Dolls

Of course, a fairy is not a fairy unless she has wings. So, I wet-felted just a couple of layers of wool and cut it into wings and needle-felted it in place.

For some of them, I used Pipe Cleaner (Chenille stem) skeleton to build around, especially if I wanted posable arms. Others seem more like scarecrow with no support structure inside and just wool roving tied up to represent long fluffy sleeves.

Kids Crafts: Felted Fairy Dolls (Waldorf-style)

Labels: , , ,


Friday, March 25, 2011

Sewing: Paste Batik Cushion Covers

paste batik

There is no doubt that the right fabric - design, color and texture - makes the sewing project look stunning.

But, pretty designer fabrics and vintage prints are not cheap. I do hunt for deals but with a very small budget for utility sewing materials, I rarely have enough to splurge on just the perfect fabric for each project. So I make do with what I manage to get. I am at peace with that. For now.

However, I feel rather fortunate that I live practically at a stone's throw from The Fabric Depot - I could live in this store! A great selection of fabrics plus sewing/quilting/crafting items and miscellaneous goodies makes this a veritable haven for craftspeople on a budget.

They had wonderful batik prints on sale a while back and I had bought half a yard each of a few colors to pair up with my own paste batik and finish up some the projects.

Finally, thanks to Spring Break for the kids, and therefore forced time off for me from work - the social set up is really asymmetric, kids are off at 3 from school but jobs are from 9-5, which means leaving the house 7-ish for average commute with time to drop off the kids in early care if available, and arranging some after school care if one can't get off work by 3... that is a separate thread I have to leave hanging at this time...

Anyway, back to the paste batik cushion covers... finally I finished a couple of cushion covers I started in early February. Nothing fancy about them. I went with some quick, easy design. Free-hand, of course. And it shows. But, that adds a bit of rustic charm to the piece, I think.

And, this peacock happens to be my default design for quick free-hand work. I've used this for the embroidered cushion covers, for greeting cards, for fabric painting on Ana's clothes... all that repeated drawing over a couple of decades has etched this in my muscle-memory, it looks like...


paste batik cushion cover

Sewing the cushion covers - I used a lining piece for the front, and the back is my usual overlap pattern, no buttons or fasteners to worry about.

Place the lining right side down; on top of it place the painted paste batik fabric right side up, so that the wrong sides of the two pieces so far are touching; place the overlapping back (finish raw edges first) pieces right side down, so that the right sides are touching with the paste batik fabric sandwiched. Sew the edges, zigzag the raw edges if preferred. Turn right side out and voilà, it is done.

paste batik

Labels: , , , , , ,


Saturday, March 19, 2011

Sewing: Paste Batik Pot-holders, Coasters, Place Mats

Sewing: Paste Batik Pot-holders, Coasters, Place Mats

A good friend reminded me to post pictures of the paste batik items we've been making on and off. So, here are a couple of potholders, coasters and place mats.

Place mats are much (ab)used in our house - every meal we sit down together at the dining table for involves place settings, with food served family-style sometimes but usually just portioned-out plates...

Sewing: Paste Batik Pot-holders, coasters, place mats

I had a limited set of acrylic colors I wanted to use up before I bought more vibrant ones I've been eying, so, the neon pinks and greens get repeated, as do the blues and oranges, in this set of paste batiks. Also as these are mostly utility items, the designs are just free-hand with no pattern in mind, but, there are a few other projects I've been working on with specific pattern/design.

Of course, single-color piping is overdone, so, I went with purple and yellow for the potholders. Or so I'd like to think :) Fact is, I had just enough of yellow and purple wide double-fold bias tape leftover from some older sewing project which worked out well for these pot-holders.

Usually, I just sew a layer of fresh fabric over an old pot-holder to extend its life - re-use and recycle. Sometimes, I cut up old cotton towels for the filling layer, keeping in mind that this may not quite be as heat resistant as needed. The coasters have Oggie's old wash cloth as the batting layer inside.

But, I have also sewn pot holders from scratch to give away where I've used Insul-Brite™ for heat resistant layering and it has worked out well.

Paste batik is very addictive and sometimes there'd be a few assorted size fabric pieces hanging to dry, waiting to be finished... of course, since I work only in spurts, there is always a huge lag between the gung-ho start of a new project and the eventual finish to my satisfaction... C'est la vie.

Labels: , , , , ,


Wednesday, February 9, 2011

Paste Batik Letters Flag

kids craft Paste Batik Letters Flag

Those gorgeous batik prints are hard to ignore every time I walk by them at the fabric store. I wanted to make something like that with my 5¾ year old.

Initially I was toying with wax-resist like I've done before. Rather than wax, I wanted something that can be made easily at home. (Washable) Glue batik seems popular for kids activity as it can be just washed off. But, rather than buying bottles and bottles of glue as for this project I had in mind, I settled on Paste Batik technique. (The Matchbook has a basic photo tutorial.)

As Edward Teller noted, "No endeavor that is worthwhile is simple in prospect; if it is right, it will be simple in retrospect."

Not that this was such a great endeavor for me, but, it sure must've seemed like it to Ana: Making a Happy Birthday flag which we can put up at home for birthdays!

Fortunately, thanks to her teacher, Ana and her friends had worked on this technique a couple of years ago when they made a lovely flag for the school's annual Spring Auction. So, she knew what to expect and was excited about it.

Items Used: Plain white muslin cloth, scissors, all purpose flour, water, acrylic paints in various colors, paint brush, mustard/ketchup dispenser, iron

  1. We noted how many letters there were in "Happy Birthday" (13), and cut out as many plain white muslin cloth into about 9½ x 9½ inch squares - I used a 9½ x 9½ inch quilt square I had, but, any size would be fine. (We cut out a few extras to a total of 16 squares). I wanted the unbleached muslin, but, Ana chose the bleached white ones. Which is fine.


  2. We made the paste: 1 cup (plus a few tablespoons) of all purpose or wheat flour plus 1 cup water. That's it. Add the water a little at a time, stirring constantly to remove lumps. The paste has the consistency of a slightly thick-ish crepe batter. Pour it into either an old mustard/ketchup dispenser or icing tube for easy dispensing. (This mustard dispenser is a favorite much-used tool for various activities at home, including making Roti Jala)

    kids craft paste batik home-made happy birthday flag


  3. Squirt/squeeze the mustard bottle to make patterns as needed on the fabric. We wrote one letter per square piece of fabric to make up "Happy Birthday", and added some squiggles and swirls and dots for decoration.


  4. Allow the paste to dry completely. We left it overnight by the heating vent, and hung it up on a clothesline indoors all day, for a total of 24 hours.


  5. Working with one square piece at a time, scrunch the fabric a bit to crack up the dried paste. These cracks are where the colors can sneak in and create that beautiful batik print. Then, paint any combination of favorite colors using acrylic paint. Dilute the paint with a drop or two of water to help it flow smoothly. Paint all over the fabric, on top of the dried paste, as the paint will be resisted (masked off) by the paste anyway. 


  6. Allow the painted squares to dry completely. Again, we left it by the heating vent overnight and hung it up for drying off all next day.

    kids craft paste batik home-made happy birthday flag


  7. Scrunch the now colorful fabric squares to loosen and lift off the dried paste. And start picking and peeling it off. This is the part Ana didn't enjoy, naturally. But, it has a certain monotony and rhythm to it. Make sure all the dried paste is off the fabric to reveal the beautiful print. The dried bits can be used for mosaic and collage projects.

    kids craft paste batik home-made happy birthday flag


  8. Heat set the paint: using medium high setting, iron the fabric squares using parchment paper or even a thin old napkin to protect the iron.


  9. Wash the fabric. Since I had only 13 small squares, I hand-washed them as I wasn't sure if any paint will rub off on the clothes if I washed it with a full load of laundry. Can zigzag the edges before washing to prevent excessive fraying. But, I washed first for that rustic unfinished look. Dry the fabric. This time I dried them in the dryer on low heat setting. Muslin will shrink. And it did - close to about ¾ inches all around.


  10. When dry, iron it flat on medium heat setting. Finish the edges. Can simply zigzag, or use piping. Voilà! The gorgeous home-made flag pieces are ready.


  11. I was debating sewing them together to make it easier for hanging up each time. But, decided to keep them separate. This way we could rearrange the letters any time and make up new words.

    We simply used a clothespin to put it up as decoration for birthdays in the family.

    kids craft paste batik home-made happy birthday flag

Labels: , , , , ,


Tuesday, January 11, 2011

Wet Felting and Needle Felting

Wet Felting and Needle Felting

Felting was on my list of things to try in 2010. And thanks to my mum-in-law, I finally got over my inertia and did it over the Winter Holidays. And am in love with it!

(Thanks Mom! Not just for the wool and the book, but for being there when I first tried it).

Both Wet Felting and Needle Felting are simple and rewarding activities even children can try (Ana tried and seems to like it).

This is not the felting of knitted projects, no. No knitting involved. This is just taking some plain or dyed wool roving and working it into felted fabric/shape/sculpture, something useful.

There are a number of books and youtube videos explaining the technique so I won't try to rehash it here. Suffice it to say that it is lot simpler than it sounded when I read/heard about it. And it is addictive.

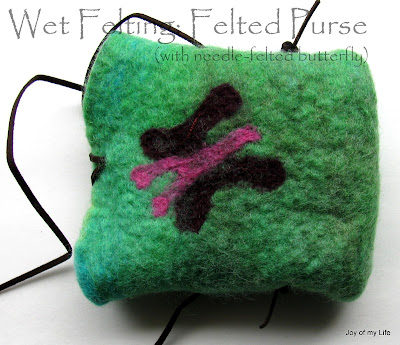
The only catch being the price of the wool. But considering it takes just about an ounce of wool roving to make the little girls' purse shown here, it should be nominal. Especially since I do it not just for the love of it but for the satisfaction and joy of giving handmade gifts for friends and family whenever I can.

(Mom, if you are reading this, your custom-dyed wool is something I am looking forward to this year!)

Some hot water, dish soap, an old roasting pan or any shallow container is all the equipment needed, along with wool roving and weighing scale and some patience and imagination, of course.

Creating the template and planning out the end product is about 70% of the work really. Since no sewing is involved, bag or shoes or hat for that matter needs to be planned out first to make sure the finished piece shapes up well. After that it is simply wet felting till the fabric passes the "pinch-test", then rinsing and drying and possibly blocking into shape as it dries.

Needle Felting is another technique by which the wool fibers are teased with a needle or punched repeatedly to create a pattern or design. A single felting needle is all that is needed, and some wool roving, of course, to create a needle-felted design on another felted fabric.

Wet Felting and Needle Felting

Project details for the purse:

Wet felting, shaping and drying the little bag, no sewing or knitting or any other skills needed. Which is why even children can try it. Of course, the water can be lukewarm (not hot) when kids try it. The hotter the water the faster the felting,

Materials for Wet Felting:
1 oz. dyed merino wool roving,
5x6 inch rectangle template (I used a bubble wrap sheet for the rectangular template),
shallow roasting pan,
hot water (as hot as the hand can tolerate),
plastic gloves if preferred,
a small amount of dish soap,

Needle Felting is just for embellishment in this project. I have a couple of needle felted projects lined up to share here someday.

Materials for Needle Felted Butterfly:
small amount of wool roving in preferred colors
needle felting tool, or punch needle tool for larger designs

To finish the purse:
Coconut shell button
Leather thong

The finished purse after drying is about 4.5x5.5 inches (it shrinks a bit on drying).

Labels: ,


Wednesday, April 21, 2010

Sewing: Easy Multipurpose Goody Bags

easy sewing goody bags

I still remember the quiet smile with which my mom acknowledged the cushion cover I held up to her: My very first independent sewing project using my mom's old manual Singer sewing machine - the kind that requires rhythmic pedaling else the old brown belt would come off, leaving me cursing and trying to set it back in the wheel. The cushion cover had ruffles at the edges to boot. And I did it with no guidance or supervision. I was probably about 9 or 10 years old and had to sit on a low stool so my feet could rest well on the pedal... at least that is how I remember it now.

And as I beamed, I did not understand why my mom did not gush at my end-product. In retrospect, I am glad she didn't. Now that I have kids of my own, I catch myself doing the same naturally. I believe in praising where due, but, I'd rather not gush, "Wow! That is so pretty!" for that emphasizes the end-product. Praise is evaluative and spotlights on the achievement. Whereas Acknowledgment is not evaluative, rather it is descriptive and focuses on the process and feelings involved. Not that I put it to good practice, but, it is nice to know the difference, even if this piece of valuable information prefers to rest at the back of my mind...

Anyway, these goody bags took me back to those days when I hadn't ventured into any complex cutting and sewing - just rectangles and squares - hankies and pillow cases. I sewed a few of these goody bags for Ana's birthday party - for the kids to take back the little craft project, prizes they won for the games, anything else they felt like stowing away from the party...

I thought a bit about the fabric to use. My preference was for plain old white muslin so the kids could use fabric crayons and decorate their own bags to take home. But, since we already had DIY foods for the party, plus some crafts, I decided to sort through my fabric scraps to pick out various patterns and colors so that each one is unique and easily identified, even with no name on it.

100% cotton 18"x22" fat quarters would work well for these goody bags - simply finish the long edges, allow for the cording and sew the hems of the short edges; then fold the fabric in half, right sides together of course, and sew the side seams, leaving the cording edges free. Thread a ribbon or cord and knot the free ends on one side, repeat the same going the other way, so as to be able to gather the knotted ends and pull to close the bag. Takes about 10 minutes per bag, especially if I choose to leave the edges raw for a casually rustic look.

Nothing much to it, really. I liked the organdy ribbons rather than the usual cording... it gave the bags a softer look.

I've sewn several bags in my life so far. I am rather a bag nut. I don't care much for handbags and beachbags though, but, I love sacks, simple totes, and backpacks, with inner and outer pockets. This same goody bag idea, only larger, with canvas or thick cotton fabric, with adjustable back-straps sewn on one side make very stylish backpack purse/bag - used to be my favorite for casual outings until the kids came along...

Over the last 5 years my "purse" has evolved into a "hold-all" where anything from diapers, wipes, extra clothes, kids' water bottles, bag of cheerios, bananas (hopefully not mushed), hand sanitizer, assorted fruit snacks, hair accessories, kids' socks etc. can be found... "Be Prepared", as my Girl Guide motto says :)

Labels: ,


Thursday, August 27, 2009

Craft: Hand-made Hanging Decor

Collages


Another of my mom's crafts...

She made the Bird Hanging Decor when she came over for Ana's birth. Yep! My mom made these lovely pair of hanging bird decor four years ago and they have been adorning our living room since and I hadn't thought of posting it until now...

Basically, cut a template for the bird in thin cardboard or cardstock paper and have it handy as we need to make many similar pieces; then cut various fabrics to the required shape, sew it leaving a 2"-3" gap for stuffing; stuff with the usual poly/fiberfill stuffing used for baby toys; sew up the gap; decorate with ribbons and beads and what-not. Finally string a few of the stuffed-and-dressed birds together using beads to separate them evenly. Attach a cute little cowbell at the bottom and it becomes a gorgeous decoration for the home.

Of course, once my mom came to know that we were setting up an Ocean-themed room for Ana three years back, she had to make a few to go with the scheme. That's how the four Sea Creatures Hanging Decor with starfish, fish, crab and other sea creatures came about. These rustic-looking one-of-a-kind Sea Creatures Hanging Decor has been adding sweetness to Ana's favorite room.

Aug-27-2009


Now, if we can settle on what Og's room is going to be,I am sure my mom will be eager to start something like this for his room as well. Of course, we are leaning towards waiting long enough so Og can bunk with Ana and we can just leave the kids in the same room and let them work it out...

I haven't attempted making these, it just seems too much work and I am a lazy craftswoman, I don't have the patience my mom has to think up patterns and sew it all by hand :) Someday I'd like to make these with Ana - maybe she'll do most of the work and I can just sit back and watch in awe!

Labels: , ,


Thursday, August 13, 2009

Crafts: Stocking fabric creations

July-27-2009-crafts14


Little bits of stocking fabric, some thin craft wires, some tape, glue, fancy decorations and some imagination is all that is needed for this stocking fabric craft that my mom does on and off.


My mom made the butterflies with a little button magnet stuck on the back so it can adorn the fridge door. The flowers are just for fun, she said.

So, Ana and I decided to try our hand at this craft. Ana wanted to make a fish. Now, being my first, I didn't quite handle the body and fin joint well, so, this looks like a mutant fish, but, it was fun making it - took less than an hour. The frustrating part was to stretch the stocking fabric over the shaped wire. According to my mom, I should have stretched more, made it almost transparent. Well, maybe next time...


Ana helped stick on some of the decorations and we let it dry for a bit. Good old Fevicol™ works better than fabric glue, even fabric glue made for stretchy materials.

The raw materials were handy as my mom usually stocks up on her craft supplies.


Labels: ,


Monday, August 3, 2009

Craft: Decorative Cylindrical Hangings

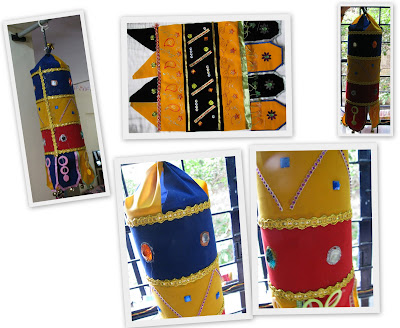
decorative cylindrical south indian style hangings easy to make

These gorgeous decorative hangings are another of my mom's creations, possibly inspired by some show or article in a magazine, she can't seem to remember...

It looked a bit daunting at first, but not anymore, not after my mom showed me how to do it. Perhaps there is a reason magicians don't reveal their trade secrets :)

Basically, take some velvet or felt-like fabric in two or three bright colors, cut into desired size strips, top triangular tapers, and shaped bottom fringes. Sew together as shown. Decorate to your heart's content. Even if the top triangles are not sewn right it is fine, mistakes barely show in this.

decorative hangings

Then, join the long edges, right sides together and sew to form a tube-like piece. Decorate to cover the joined edge. Gather the top tapering triangles, sew a little ring or a piece of chain to hang from.

Now, the trick is to find a way to hold the cylindrical shape as the fabric will simply hang limp.

My mom used some of the old X-rays she had - simply roll the old X-ray films to desired size and push it inside the tube to hold shape.

Ideally, if using X-ray film for insert, measure the X-ray film first and then cut the fabric to match. Additionally, use some thermocol (polystyrene) from packaging - cut into cylinders or a few disks to hold the shape.

Else, some PVC tubes can be used. Even thin cardboard that will bend freely can be used. Or, for slimmer, smaller hangings (for practice) use 1 liter water bottles as inserts.

Just get creative!

Labels: , ,


Tuesday, July 28, 2009

Craft: Simple Tube Flowers


Now, my mom likes to try out different craft activities on and off. She patiently hunts and gathers the raw materials, tries out a few till she is satisfied, and puts it away to move on to another activity.

This here is one such simple thing she tried sometime back, before my visit. It looked quite pretty that I wanted to record it here.

Materials used: thin wires, colorful hollow designed tubes, green tape

Simply insert thin wires into the hollow colorful tubes and bend the wire to shape the petals. Group these petals in a flower shape, add the stem wire, and bind it all together with the green tape.

Labels: ,


Tuesday, August 26, 2008

Tanjore Art: Aalilai Krishnan

Tanjore Art painting Aalilai Krishnan

Until recently, this adorable Aalilai Krishnan art work was hanging in my parents' home in India, and I had forgotten all about it. This trip, when they came to help out with Oggie's birth, they decided to bring it for my home here. This art work depicts Krishna as a baby, sucking on his toe, floating on a Banyan Tree leaf.

This is a potent representation of Vishnu, the manifest Preserver of the Universe, floating on the water after the deluge that destroyed the corrupt and decomposing old Universe, free to create a pleasant new Universe. I am not sure of the entire mythological significance of His baby form, and the reason for His toe-sucking. But, this representation of Krishna has always been my most favorite among the depictions of Baby Krishna.

Krishna as Partha Sarathy, the charioteer for Arjuna, is another of my favorite representations of adult Krishna, especially when he assumes Vishva Roopam while delivering what we now know as Bhagavadh Geetha.

I learnt Tanjore Art, as it is called, from a master when I was in Madras (aka Chennai, India). I love the gold foil and stones, but, more importantly I love the style of rendition of the Gods in this art form.

When my master asked me if I wanted to do the traditional Ganesha for my first independent work, I hesitated... I was eyeing the Aalilai Krishnan sample longingly. And that's what he guided me to finish - starting from preparing the board, to tracing the figure, to making the base outlines with the paste to adding gold foil and stones and finally painting the image.

I was terrified of ruining the laborious work by jerking my nervous hand when painting the eyebrows and mouth, and I remember appealing to my master to finish it for me.

When my mom decided to use it for the Krishna Janmashtami decorations a few days ago, I was quite touched. So far, it was just art work, despite the divine subject. But slowly it has begun to exert a mesmerizing influence on me, almost teasing me with images of this Baby Krishna getting up from the leaf and coming to me!

I have done a couple of small ones since - just elephants, not Gods - and am still not confident of taking on a large project. But, someday, when kids are older and I have a ton of patience, I hope to take it up again...

Labels: , ,


Sunday, June 17, 2007

Happy Father's Day!

happy-fathers-day-1


Items used: popsicle sticks (jumbo), pom-poms, 2-inch piece of ribbon (or raffia string), craft glue; plus favorite photo.

I think the picture says it all... very simple photo frame for show-casing your favorite daddy-baby moment.

Happy Father's Day, D!

More kids crafts here

Labels: ,


Sunday, March 4, 2007

Rhonwen

fairy doll making
I was thinking about a dear friend of mine this past weekend. Thinking about her a lot. Itching to call her and talk to her, but, not knowing what to say, I did not call...

She sent a cute fairy doll making kit for Christmas. Thank you, dear girl.

I was saving it to do as a project with my wee tot when she is older and ready for it.

But, I couldn't wait. I just had to find a way to deal with the restlessness I was experiencing.

Making this fairy doll proved therapeutic. It was very relaxing...

It is meant to be a cute project for little girls. But, making this fairy doll made me feel like a little girl again.

We named her Rhonwen. D helped pick the name as he sensed the restlessness in me...

Rhonwen in Welsh means fair-haired or something like that. Rowena/Rowan is the English equivalent, I believe.


Labels: , , , , ,


Sunday, February 11, 2007

baby mat toy tote

baby mat toy tote

"Remember E who works with me? We went to their wedding reception a couple of years ago?", D quizzed.

"Ummm... ya, I remember, they both are your colleagues, right?" I remembered, but, our paths hadn't crossed since.

"Well, they are expecting a baby."

"Wow! How nice!! Do they know if it is a girl or a boy?"

"Girl, I think. Anyway, we are having a baby shower at work for them. It would be nice if we could gift one of your baby quilts or something."

"Yay! sure, of course! that would be super! But wait, I gave away all my quilts. I don't have any ready. I could make one. When is the shower?"

"Coming Monday."

"Poop."

"You could just shop for some baby stuff. I wouldn't have a clue what to get..."

"Umm... let me see... I can make something. I like hand-made gifts for baby showers. Wish I had known earlier..."

baby mat toy tote

I had always wanted one of these Quilted Baby Mats that double as a Toy Tote when my wee tot Ana was little. I was too exhausted during those post-partum days to make anything like this.

Thanks to my mom and dad, who stayed with us for several weeks after baby's arrival, doing all the cooking and cleaning, I was at least able to get myself together during the 30 days of maternity leave I got. Then it was off to work again and things were a blur.

I started sewing and crocheting in right earnest again only after Ana was close to a year old. Till then it was just a small crochet cap or sweater, a simple fleece hat or tops, that's it.

baby mat toy tote

This was inspired by one of the projects in my craft book.

Open the hook-and-loop fasteners on the sides and it unfolds to a soft, plush, quilted baby mat.

Plenty of room for a baby to hang out and play with her toys. Till she learns to scoot on her belly or crawl, say till about 5 months or so, it can work as a take-along mat.

Have all the toys spread out on the mat, plant the baby on it, give her plenty of tummy time...

And, when it is time to get going, just scoop the baby up, gather up the mat and press the sides together, and effortlessly tote all her toys away.

I hope E likes it and finds it useful. I can't wait to see pictures of their little baby girl...

Well, that was my weekend project. It was a lot of fun. The flannel fabric print was just too adorable. I held on to the scraps, carefully cut out some of the animals to make patches out of them and applique them on other projects.

Labels: , , , ,


Saturday, February 3, 2007

fleece bag with crochet heart pocket

fleece bacg with crochet heart pocket This whole week was a bit of a blur as all of us were sick at home. We are recovering. It was the Flu, I think... but, with both parents sick, it gets hard to handle a sick and willful toddler. We managed. I can't help but admire parents with more than one child - where do they get the energy from and how do they manage when they all fall sick?

Anyway, this morning, my fever is down, headache is under control, not very nauseous anymore, so I started feeling very restless and needed some creative outlet. I made a fleece bag with crochet heart pocket.

The crochet heart I mentioned in previous post sort of seemed inadequate to send as a gift for a little 4-yr old, so, I decided to make a bag for it :-)

This is a simple fleece bag, with the crochet heart forming the front detail as well as a pocket of sorts to tote all the little-girl things around. I added a simple fringe at the bottom, and some embroidery detail. Fleece is so wonderful for this project as it doesn't fray, or pill, or shrink.

My wee tot is too young now to carry a bag around like this, so, maybe next year I'll make one for her...

Labels: , , , , ,


Sunday, January 28, 2007

hearts galore

It was a lazy Saturday. It was a beautiful day, so we played in the backyard. Baby had a nice lunch and took an undisturbed 70-minute nap, which gave me plenty of time to either get some rest, or read my George RR Martin book, or blog, or clean up the house a bit... But, I decided to do something else instead.

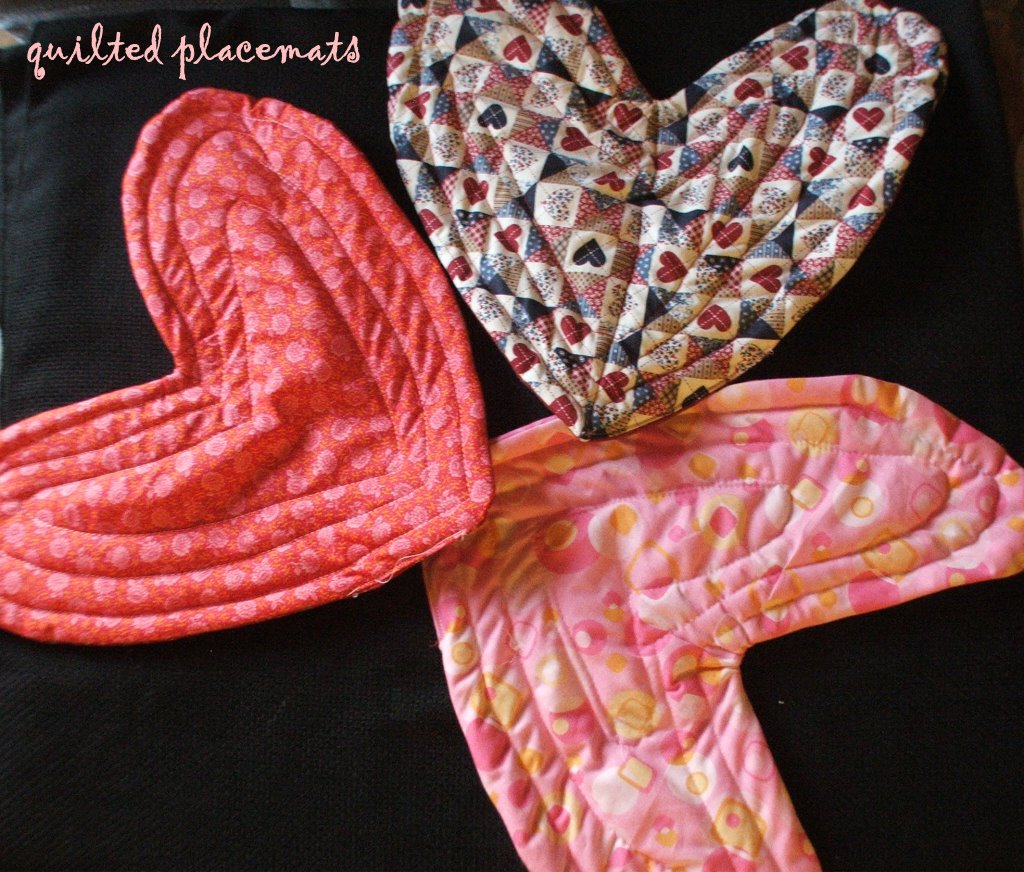
Along the lines of valentine kitsch, I made a heart-shaped placemat for each of us at home. Just so it doesn't make D want to throw up, I made one of them in a non-pink, non-red fabric, and smaller so they can sit on top of a regular placemat :)

I had a bit of chenille yarn left from making a sweater for my wee tot and decided to make a heart for my friend's 4-yr-old baby girl who has taken a sudden liking to hearts. If I can mail it in time, I hope it brings a little smile to her face.

Labels: , , , ,


‹Older