sewing: boy shorts and cutesy tops
 I finally caved in and bought Burda 9744 pattern on sale at JoAnn's. That's the tops pattern used here.
I can handle sleeveless tops, even plain set-in sleeves like I've done on the "toddler designer tees" on my own, but, making puff-sleeves proved a little annoying without a good pattern.
This was a very easy pattern to follow. I have little patience for several niggly steps which, of course, are essential to get the right finish.
But this time, I managed fine - used interfacing as instructed, ironed, and ironed again at each step; of course, I hate basting, but, pinned the pieces well enough to sew on the machine...
Best of all it took about 5 minutes to cut, and about 90 minutes to sew - including ironing, pinning, button-holing, removing the hastily done wrong stitch while attaching the collar etc ;-)
My skills and temperament being as they are, this tops would probably get a 7 on 10 from the QA inspector at a fairly good sweat-shop... er... clothing factory.
The nice thing about following a pattern is that the cutting, piecing and finishing instructions are all given, and using the same pattern, I can make many more tops and they will all turn out just fine, as long as I follow instructions correctly. No guesswork. No short-cuts.
That's my problem when sewing: I look for short-cuts and end up messing with the tried-and-tested techniques I picked up from my mom. Brilliant idea (not): why don't I sew the side seams on the pants before I do the inseam?
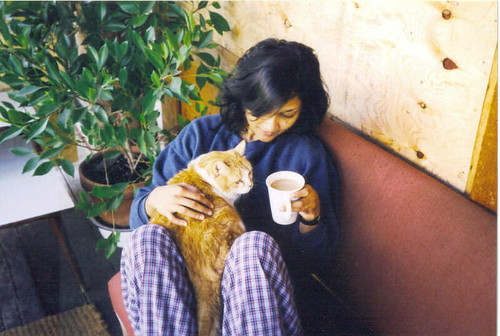
The boy shorts is not very different from the other shorts I made, I just cut it tighter and made it less flaring so it looks a little boyish - just to practice so I can make a few for my little nephew who recently turned one.
 Ana seems to love this outfit. If she catches sight of it, she immediately wants to get out of whatever she is wearing and slip into this outfit. So far so good.
 Now, getting her to pose for my photos has not been as easy. She is beginning to understand about the camera. When I click and show her the shot right away, she seems pretty thrilled, and states proudly, "Ana baby in Amma's camera"!
She is still not ready to follow instructions and stand at the right spot so the lighting is just-so and the angle is perfect... all in good time ;-)
Labels: baby clothes, sewing, toddler, toddlertops
posted by Sheela @ Thursday, July 12, 2007
![]()
![]()

9 Comments:
Hi Sheela,
Came here from your food bog. That outfit looks SO adorable on your your li'l one. Are you talented or what!
Mamatha
Very cutesy top! I love Burda too. Have a few bwof mags - which I still haven't attempted to try, right now, I like to read and see the pics and patterns.
Btw, It really is a brilliant idea to sew the side seams first. The method of assembling it slightly differs. It is very simple and too easy to do it with sewing side seams first. I can post instructions if you want it.
hi Kay, ya, burda is good, I like kwiksew too... but, i prefer to buy patterns for things like costumes and such rather than everyday casual clothes (esp., when some simple patterns are close to 9.95$)...
and, it is not a great idea to change the assembly order and try to do things out of order is what i meant, especially if following a particular pattern - yes, I am sure there are several ways to sew, provided we assemble right - i'd love to see your instructions - send me your link when you post it.
Sheela, I'll jot it down here.. not much time to blog these days. I often wonder if I should start a blog for my other hobbies and then think I don't write as often as I'd like, on my food blog as such. Maybe someday soon, when my li'l one doesn't need me 'all the time'. :)
Here are the details. I picked these up from a kwiksew pattern.
1. Sew the side seams of both legs.
2. Then sew the inseam of each leg. Don't touch the crotch seam.
3. Pull one leg right side out. Insert this inside the other leg. The right sides of the legs will be touching each other.
4. Now, sew the crotch seam (the U shaped seam) in one long line.
5. Pull the pant legs out.
6. At this point, the pants are done and we can do the waist elastic treatment and hemming.
To me, It's easier than the other method. That's why I said, your idea was brilliant.
And, well, If you are used to kwiksew, then you might know these already. :)
hi Kay, thanks, ya, i do that too...
and you know, for straight leg, elastic waist lounge-pants with not much shaping (especially for kids), I do a double fold while cutting so that I don't have to sew side seams at all - each of the folds forms the "side seam" of sorts and i am left to just do the inseam, center and the waist. no problem.
indeed there are many way to sew...
again, as i had mentioned in my earlier comment - the point was not about side-seams/in-seams in particular, but about taking short-cuts or changing the order on a particular type of assembly :-)
i am sitting with like say step 3 out of 7 steps of a particular assembly/pattern, and i try to skip or change the next steps thinking it might be a short-cut... not a great idea unless i know what i am doing and how to correct it - be it pants or Inverness - well, pants at least one can correct from common sense, i guess ;-)
Ah! I got it now. Sometimes I can be so dense. Thanks for being patient with me. :) I agree, It makes more sense to follow the rest of the instructions when we are already knee deep in it.
I like those one-seam pants too. Very easy to make. and no seams on the side - so more comfort. I was under the impression that the front and back had to be attached together to make a pair of pants 'one-seam', but your idea takes the cake. :) So easy - esp, for kids where fit isn't that big a deal. Thanks for sharing it.
And Sheela, Is it better to use the pattern for the 'back' on fold or 'front'?
hi kay, you know, for the double fold pants, i don't use a pattern, i approximate the measurement. I get the waist-to-crotch measurement i need (will vary depending on baby wearing what size diaper, so, i go with a reasonable one), let's say 9 inches. Get the approximate waist measurement too, say 22"; also, measure and note the total length you want for the pants, let's say 16 inches (babies have such short legs, don't they?!)
then, allowing for 1" seam or less, depending on your preference, get say 20" long and about 32" wide (22" + 10" is what I did, so it is baggy and will grow with the kid) fabric, folded like a saree pleat, only 2 pleats :-)
then, measure 10" from top and mark in the cut edge, and draw a curved shaping from top to this mark - which will be the center seam; then, from that 10" mark to the bottom, draw an almost straight but slightly shaped line to the bottom which will form the inseam... and cut.
geez... am i even making sense, i am typing as i am thinking... anyway, you to sew well, so am sure you get the idea even if i am not being very clear here...
well, maybe on reading the comment i hastily published, one more point, whic is probably obvious...
'then, measure 10" from top and mark in the cut edge, and draw a curved shaping from top to this mark - '
mark about 8" on top edge from the cut edge - this is where the curved line will start and end at the 10" mark down the cut side as before...
i have a renewed appreciation for sewing instruction books now - esp., the ones that are easy to follow :-)
Wow! Thanks Sheela for sharing your drafting instructions.. I'll try it sometime soon and let you know.
Post a Comment
<< Home